Home Articles

The Homeowner’s Guide to Roof Installation

Written by Joe Roberts , Edited by Gianna Cappuccio

Published on May 31, 2024

Share

The Homeowner’s Guide to Roof Installation

National Average Range:
$15,159 - $27,580
Get local cost

To provide you with the most accurate and up-to-date information, we consult a number of sources when producing each article, including licensed contractors and industry experts.

Read about our editorial process here. Want to use our cost data? Click here.

Are you installing a new roof? If so, you may be wondering exactly how much time, money, and effort you'll need to put into this home improvement project. The average roof installation costs between $15,159 and $27,580, which may be shocking, but it's important to remember that the benefits of installing a new roof far outweigh the costs.

A new roof can greatly increase your home’s curb appeal and resale value, for one thing, and the roof will protect your home’s interior from rain, snow, and wind for decades to come.

In this article, we’ll go over the average prices, benefits, and installation procedures for the different roofing options to help you choose the best roof for your home.

Hire professional roofing contractors to get the best roof money can buy

Key takeaways

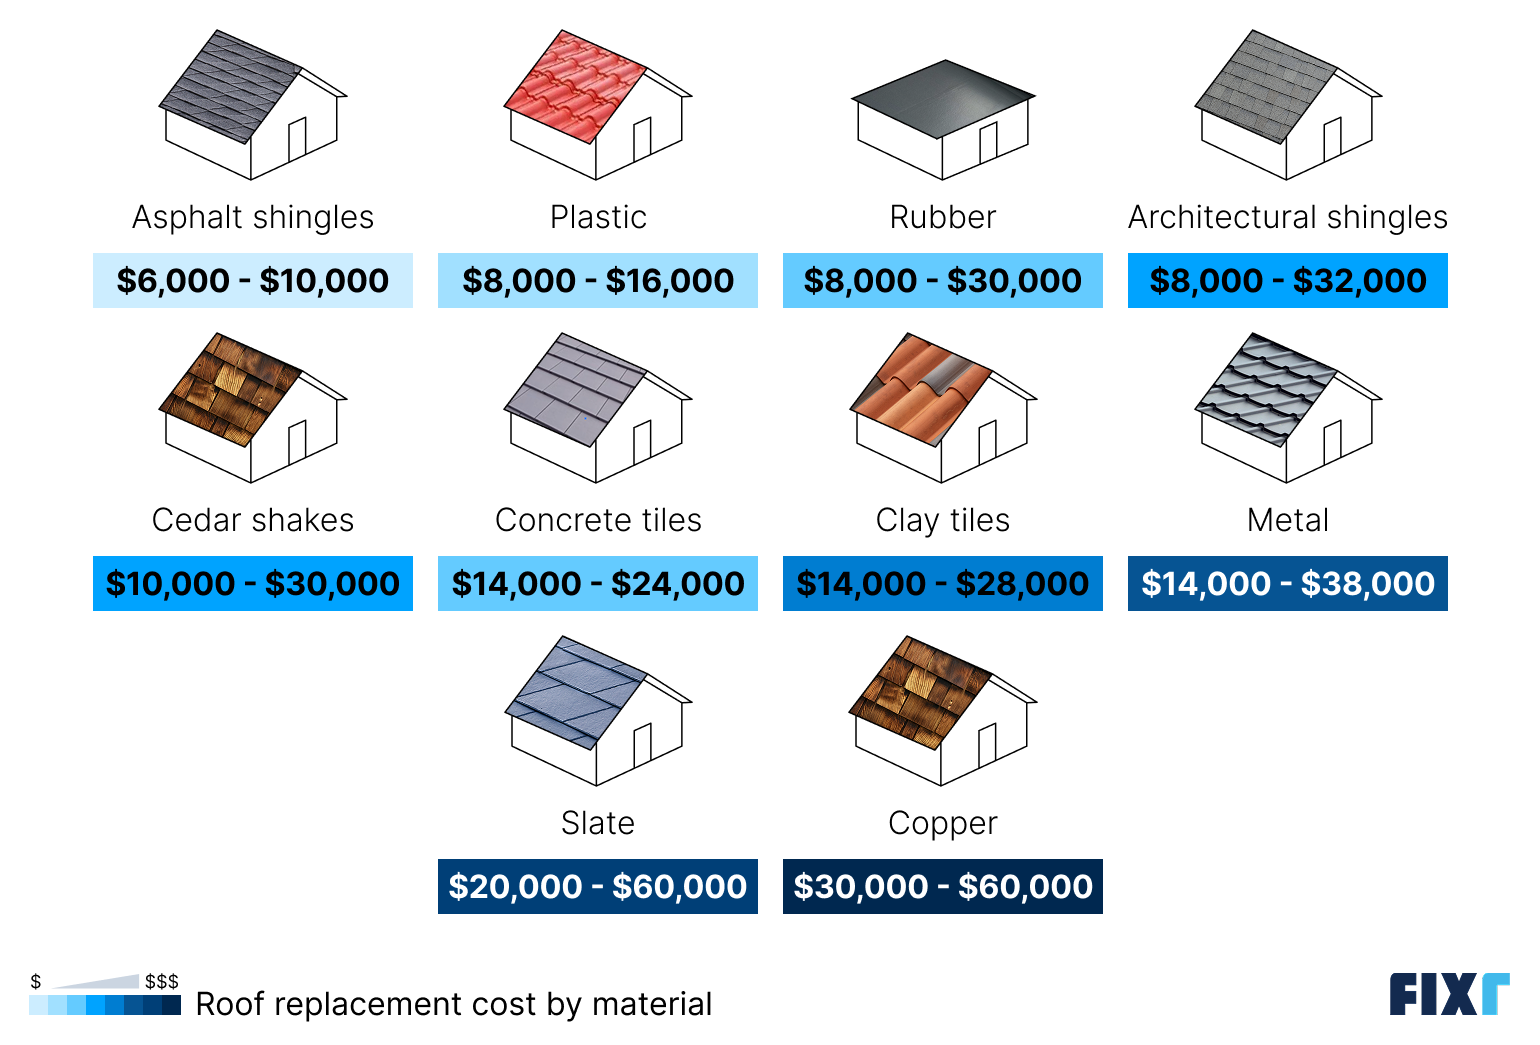
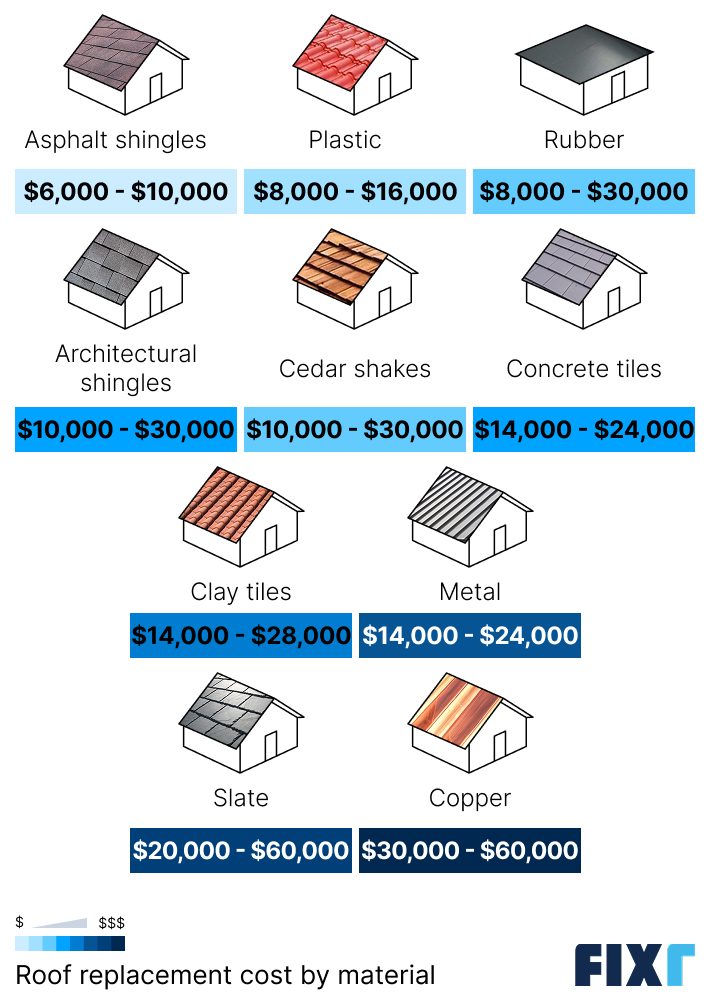
  • Depending on the size of your home and the material you choose for your roofing, professional roof installation and reroofing can cost anywhere between $6,000 and $60,000, though prices around $20,000 are the most common. 

  • You should routinely inspect your roof for water damage and missing shingles so you know when to install it, especially as it nears the end of its projected lifespan.

  • Routine inspections, quick fixes, regular cleanings, and gutter maintenance are all necessary to properly care for your new roof.

  • DIY roof installation is highly risky, both financially and physically, so it is always best to leave a roofing project to professionals.

How much does it cost to install a roof?

On average, you should expect to pay around $21,054 to install a new roof. However, prices depend on the size of your roof, its pitch, whether or not it features design accents like dormers, and which roofing material you choose. They can even vary depending on where you live. 

Because of all these variables, average roof installation can cost anywhere between $6,000 and $60,000, so you shouldn’t bank on any price until you meet with a contractor and receive a written estimate. 

That said, the table below can give you an idea of what you’ll likely pay to install a new roof. 

Installation costs for different roofing materials

Material

Average cost per roofing square (100 square feet)

Average cost to install a 1,700 square foot roof

Plastic (PVC)

$428

$5,235–$9,525

Asphalt shingles

$476

$5,822–$10,593

Concrete tile

$806

$9,860–$17,940

Wood shingles

$969

$11,865–$21,588

Wood shakes

$1,018

$12,465–$22,679

Clay tile

$941

$11,522–$20,964

Slate

$1,500

$18,361–$33,407

Metal

$1,419

$17,366–$31,597

Copper

$3,589

$43,931–$79,931

These prices include all the material and labor costs to install a new 1,700-square-foot roof. They also include the rates to tear off the old roofing, clean up all the debris, and rent dumpsters. Secondary roofing system materials like felt underlayment, fasteners, and sheathing are also included.

To learn more, read our full guide on roof installation costs.

When should you install a new roof?

While some of the signs that you need to install a new roof, like collapses or heavy leaks, are obvious, others can be harder to spot. To determine if you need a new roof, carefully inspect the old one for these warning signs:

  • Damaged or missing shingles, ridge caps, shakes, or tiles. Even a single missing piece of your roofing system can result in extensive damage down the road.

  • Water damage in your attic or the walls of your topmost floor. Discolored splotches, mold, rotten wood, and peeling paint can all signal storm damage. 

  • Sections of the roof that are sagging. If your roof’s ridge or flat surfaces are sagging, it usually means that your roof decking is compromised and needs to be updated along with the rest of your roofing system, resulting in additional costs.

You should also take the age of your roof into account. The lifespan of any roof depends on what it’s made from and how well it’s been taken care of. For example, an asphalt shingle roof can last up to 30 years when properly maintained while a slate roof can easily last 100 years or more.

When your roof is starting to near the end of its life cycle, you should get it inspected by a pro, even if you don’t notice obvious damage. Trained eyes are more likely to catch something you can’t, and small issues with a roofing system can snowball into much bigger problems as time goes on.

Catching issues early sometimes means you can restore your roof with some affordable roof repairs instead of getting an entirely new roof. If your roof is still under warranty when you notice the damage, you could end up paying nothing for repairs.

What to expect when you get a roof installed

The first step of any roof installation is an inspection from a qualified roofing contractor. The roofer will come out to assess your home, discuss your options with you, and answer any questions you have. After this, the roofer will generate an estimate that you can either agree to or walk away from.

If you decide to walk away and get another estimate from a different contractor, the process starts over. But if you like the price the first roofer gave you and decide to move forward, the real work will begin.

Your contractor will then pull all the permits local building codes require before they show up to begin the installation. Then, on the day you and your roofer schedule together, the roofing crew will come and remove your old shingles, tiles, or shakes and begin installing the new roofing materials. 

Depending on what your old roof is made from, what material you chose for your new roof, the size of your roof, and the condition of your roof’s decking, this step can take anywhere between one to seven days to complete. Adverse weather conditions can also prolong the timeline.

Once your new roof is complete, you’ll need to get a second inspection to ensure all of the work is up to code. Not only will this give you some peace of mind, but it will also help if you need to make a warranty claim later, and many local laws require roof inspections for newly installed roofs.

Once the inspection is complete and everything is in order, your new roof is finished! However, you’ll need to stay on top of routine roof maintenance tasks to ensure it lasts a long time.

Preparing for your roof installation

Step 1: Gathering tools, materials, and permits

To begin, your contractor will contact your city’s offices to pull all the permits this project will require. Depending on where you live, this will involve jumping through a few different hoops and paying a few fees, but skipping this step can result in hefty fines and forced removal of the roofing you install.

After you have the permits you need, your contractor will assemble everything listed below. The kind of underlayment and fasteners you need will depend on which roofing material you get.

Contractor tools

Materials used

  • Work gloves

  • Hard hat

  • Ladder

  • Safety harness

  • Chalk line

  • Nail or staple gun

  • Straightedge

  • Utility knives

  • Pry bar

  • Tin snips

  • Hook blades

  • Circular saw

  • Broom

  • Rental dumpster

  • Your chosen roofing material

  • Underlayment

  • Drip edges

  • Fasteners (roofing nails, staples, etc.)

  • Sealant

  • Ridge caps

  • Ridge vents

  • Flashing (if you need to update the old flashing)

  • Tarp

Step 2: Preparing your yard, roof, and driveway

The next step is getting your home ready for the roofing project. Your contractor will lay tarps over your bushes, sculptures, and other landscaping features to keep everything tidy. It can also help to relocate any potted plants or movable sculptures into your garage ahead of time.

Your contractors will also park a dumpster in your driveway for easy access, and sweep all branches and other debris off your roof.

Lastly, they’ll set up their safety harness(es). After this step, the work will begin.

Pro tip

To ensure your roofing project goes smoothly, secure or board your pets before your contractors show up on installation day. This will keep your furry friends from going crazy because of all the strangers, and it will ensure they don’t escape or get injured by falling debris.

Step-by-step roof installation process

  1. Remove old roofing materials

  2. Install new flashing and underlayment

  3. Install new roofing materials

  4. Clean the area

  5. Get the roof inspected

Step 1: Removing the old roofing material and underlayment

A roofer peeling up and removing old roofing material and underlaymentIf you’re removing an old roof before installing a new one, your contractors will clear away all the old roofing materials and underlayment before they install the new roofing. If you’re installing a new roof on bare decking, though, they’ll skip this step.

Using a pry bar and utility knife, they’ll carefully peel up the old shingles, shakes, or tiles, and they’ll go slowly to avoid gouging your roof decking. As they remove each piece, they’ll toss it down into your dumpster to keep the work area free of hazardous debris.

While removing the roofing shingles or tiles, they'll likely also tear up some of the underlayment, but if there’s any left after they've finished tearing away the roofing, they’ll then remove it completely.

Then, they’ll inspect your flashing (the metal sheeting in the roof’s valleys and joints) and drip edges (the metal sheets along the sides of the roof) to determine if they’re still serviceable.

If the flashing or drip edges are rusted, dented, or bent, the crew will remove them with pry bars to make way for the new material. If it’s all in good condition, though, they’ll probably just leave it to reuse under your new roofing materials. 

Step 2: Installing new flashing, drip edges, and underlayment

If the crew had to remove the old flashing, they’ll now install new flashing. Then, they’ll install the new drip edges along the edges of the roof. Once these materials are in place, they’ll install the new underlayment.

To install this material, the crew will roll it out and staple it down to completely cover your roof’s decking. They’ll leave a small amount of overlap between pieces to provide your decking with complete coverage.

After all the flashing and underlayment are securely in place, they’ll move on. 

Step 3: Installing the new roofing materials

Three roofers on a roof installing metal roofing sheetsNow comes the hardest part: installing your actual roofing materials. This step will largely depend on the type of roofing you’re installing.

For example, 3-tab asphalt shingles are usually installed horizontally from the bottom edge of a roof—where starter shingles get installed—upward. As your crew works, they’ll make sure the new shingles overlap for complete coverage. They’ll also lay down some sealant between the shingles to make them more water-resistant.

For clay tiles, they’ll install them from the bottom eaves up as well. Depending on the shape of your tiles, they’ll have edges where they are meant to hook into each other for weather resistance. Your tiles will also likely require roof hooks and foam sealant to hold them in place.

If you’re installing a metal roof, the crew will lay the panels down so they overlap and nest together for a watertight seal, then screw them down into your decking in the designated spots.

These are just a few examples, and as we mentioned, the installation process can vary dramatically depending on what type of roofing you get and the brand that manufactured it. This is part of the reason DIY installation is such a bad idea. If you aren’t trained to install the roofing you’re using, you’re likely to install it at least slightly wrong.

If you do attempt DIY installation, follow the manufacturer’s instructions to a T, even where they conflict with the instructions we’ve given here.

Step 4: Clean the area

Once all of your roofing is in place, it’s time to clean up your home. Your roofers will sweep the roof to remove loose pieces of material and sealant, throw all the debris that landed in your yard into the dumpster, and clear away all the tarps they laid down earlier. 

Step 5: Get the roof inspected

The final step is to get the roof inspected to ensure it’s up to code. Contact your city’s offices again to have someone from the local government come out and inspect the work. If the handiwork passes, you’re all finished!

If, however, they notice something amiss with your roof that they deem hazardous, they could force you to rectify the issue. In some cases, this could mean starting over completely.

As we mentioned, though, skipping this step can have serious consequences, so you should always get your roof inspected after you work on it.

Roof work is complex and dangerous. Hire pros to handle it for you

Post-installation considerations

We’ve mentioned that you should get your roof inspected if you think it’s approaching the end of its lifespan, but it’s also a good idea to just get a professional roof inspection done every year or two. This will ensure you always have an accurate idea of your roof’s condition, and it will help you nip damage in the bud with minimal repairs.

On top of regular inspections and quick repairs, though, there are a few other things you should do to keep your roof in pristine condition for as long as possible:

If you stay on top of all these maintenance duties and quickly make repairs that turn up during annual inspections, your roof will last much, much longer.

Register any applicable warranties

New roofing materials almost always come with manufacturer’s warranties, and whoever installs your roof may also offer a warranty on the work they did. This means that if your roof fails prematurely and the damage is covered by a warranty, you could get a sizeable discount on the repairs. Some warranties will even cover repairs free of charge!

Unfortunately, you may need to register your warranty before it becomes applicable. Pour over the warranty documents that come with your new roof and jump through the hoops they outline to get your roofing covered by the warranty. This will usually involve calling the company offering the warranty and providing them some information.

Be warned that you’ll need to do this soon after your roof is installed! If you wait too long, you may not be able to register your roof. 

How to take care of your new roof

We’ve mentioned that you should get your roof inspected if you think it’s approaching the end of its lifespan, but it’s also a good idea to just get a professional roof inspection done every year or two. This will ensure you always have an accurate idea of your roof’s condition, and it will help you nip damage in the bud with minimal repairs.

On top of regular inspections and quick repairs, though, there are a few other things you should do to keep your roof in pristine condition for as long as possible:

If you stay on top of all these maintenance duties and quickly make repairs that turn up during annual inspections, your roof will last much, much longer. 

Where to go with questions and issues

If you experience any issues with your new roofing or you have questions regarding the installation or materials, call the installer or manufacturer’s customer service line. To ensure you can find the correct number later, hold onto your installer’s business card and keep any documentation that came with your roofing materials.

DIY vs. professional roof installation

A roofer nailing asphalt roof shingles onto a roof using a nail gunAs long as you get all the necessary permits and inspections, there’s no law against installing your roof with your own two hands. However, we highly advise against DIY roof installation for a few important reasons:

  • Roof installation comes with pretty significant risks to life and limb for those who aren’t properly trained. Falling off a ladder, mishandling tools, and overheating from working directly under the sun for hours on end can all result in a costly trip to the hospital—or worse. There’s a good reason OSHA considers roofing one of the most dangerous occupations.

  • Improper installation can result in premature roof leaks, collapses, and other types of damage.

  • DIY installation can void the warranty of your roofing materials, meaning you’ll have to pay for any damage out of pocket. 

Considering the many potential perils of DIYroof installation, we highly recommend hiring a professional roofing contractor for the job. Even the money you might save on labor costs is greatly outweighed by the money you could pay to repair damages that result from amateur craftsmanship. Proper installation is worth the high costs.

Roofing brands we recommend

To find a roofing contractor, check the reviews and credentials of local roofing companies. In particular, look for well-liked roofers with National Roofing Contractors Association (NRCA) certification. The NRCA only certifies trustworthy roofers with high levels of expertise, so you know you can trust an NRCA-certified roofer to do a great job. 

As for which brand to purchase your roofing materials from, we have a few suggestions:

GAF

GAF is one of the biggest names in asphalt shingles and for a very good reason. The brand has been around for over 100 years, and in that time it has developed some of the best-selling shingles in the country. From affordable 3-Tab shingles to stately designer models—all of which come in a wide variety of colors—GAF’s selection is sure to include a shingle you’ll love. 

Ludowici

If you’d rather have tile than shingles, look no further than Ludowici. Since 1888, the brand has provided some of the most stylish and durable tiles and roof accessories on the market. Some of the brand’s terracotta tile models are even crafted to mimic the textures and appearances of materials like slate and wooden shakes, so you can get just about any look you want from Ludowici. 

TAMKO

With over 70 years of experience providing high-quality metal and asphalt roofs, TAMKO is another fantastic brand to source your roofing materials. The brand’s asphalt and steel shingles come in an immense variety of styles and colors, and it also offers a healthy assortment of underlayments to pair with its roofing products. 

Honorable mentions

How to hire a roof installation contractor

To find a qualified roofing contractor in your area, we recommend you start by checking the reviews customers have left for numerous different roofing companies. Pay special attention to customers who got the same kind of roofing you plan to.

Then, once you find a well-reviewed company, check their certifications and credentials to make sure they’re properly licensed to work in your city and state. This will ensure you hire a company that will meet local building codes.

Lastly, schedule in-person inspections with a few different companies you’ve vetted, and request quotes from each one so you can compare prices. This will ensure you find the most affordable company for the job.

Pro tip

While requesting multiple quotes is the best way to ensure you find the most affordable price for your roofing project, it will take some time, and not all contractors will wait for you to get competitor quotes. This might mean your favorite contractor will book a different customer in your time slot, and you’ll have to work with someone else. If your preferred installer gives you a reasonable price estimate, it may be better to just hire them on the spot instead of getting a second quote to compare it against.

New roof installation in a nutshell

Now that you know how much roof installation can cost, what it requires, and how to do it yourself (as well as why you shouldn’t), the next step is to get an estimate from a roofing contractor or two.

Get your new roof installed by an experienced professional

Frequently asked questions

A roof’s longevity heavily depends on what it’s made from and how well it is taken care of. When properly cared for, an asphalt shingle roof can last up to 30 years, a clay tile roof can easily last over 50 years, and a slate roof can last over a century.

The best way to find a qualified roofing contractor is to peruse the credentials of any roofer you might hire and look for certification from the National Roofing Contractors Association (NRCA). This organization only certifies roofers who have proven both competent and trustworthy, so you know you’re getting the best of the best when you hire a roofer with NRCA certification.

While professional roof installation usually only takes one to three days to complete, the size of your roof and the roofing material you’ve chosen can lengthen the timeline. In some cases, roof installation can take over a week, and DIY installation can take significantly longer.

No, it takes a lot of training and experience to properly install a roof. Even installing “easy” materials like asphalt shingles can prove too difficult for most amateurs. Additionally, roofing is a pretty dangerous project that comes with a significant risk of injury or death due to falling or mishandling hazardous power tools.

Roofers install felt, rubber, or fiber underlayment under all of a roof’s shingles. The underlayment serves as a water-resistant barrier that prevents rain or ice from seeping beneath the shingles and damaging the roof’s decking. To reinforce this system, they also install flashing—metal sheets—along corners, around skylights and chimneys, along all the roof’s peaks, and around every edge of the roof. Exactly what type of underlayment and flashing your roofers install—and where they put it—can depend on what your new shingles are made from, though.

Asphalt shingles are the most popular roofing material in the United States because they offer the best combination of style, durability, and affordability. However, other materials—like clay, copper, and slate—can all last much longer and are generally better for adding curb appeal.

Roof installation is a very expensive home improvement project, and few people can pay for their new roofs in full with cash. Luckily, there are several different ways to pay for a new roof without paying upfront: - Finance through your installer - Take out a personal loan or home equity loan - Open a home equity line of credit - Make a warranty or insurance claim

Getting a new roof installed will give your entire home a renewed layer of defense against the elements, ensuring you won’t have to worry about rain, ice, or wind damage to the interior of your home for decades. Additionally, it can substantially increase the curb appeal and resale value of your home.

Written by

Joe Roberts Content Specialist

Joe is a home improvement expert and content specialist for Fixr.com. He’s been writing home services content for over eight years, leveraging his research and composition skills to produce consumer-minded articles that demystify everything from moving to remodeling. His work has been sourced by various news sources and business journals, including Nasdaq.com and USA Today. When he isn’t writing about home improvement or climate issues, Joe can be found in bookstores and record shops.